Thanks to Ben Bird of bensoftware and SecuritySpy fame I was able to work around the problem in High Sierra. If any Mac users are interested in really good DVR software I can whole heartedly recommend his Security Spy app. It works great with XTension and we even have an interface that will let you get motion data out of the program and assigned to units in XTension for taking other actions based on that.
The problem is evident in Mac OS version 10.13.2 and may actually have been introduced in the .2 update as I don’t recall having this problem immediately upon my updating to High Sierra but only more recently. I could be completely wrong about that though.
It turns out it has nothing to do with App Nap at all, I was barking up the wrong tree about that completely. It’s a rather nasty bug in some of Apple's screen drawing code. If you have an app that has an interface and it causes interface elements to update once the screen goes to sleep High Sierra will eventually just hang. Something causes a thread contention with the screen drawing. This might not be a big problem for most user apps as if the screen is asleep then you’re not using them. They will wake up along with the screen as soon as you touch the computer again. For an app that needs to keep doing things while you’re not there like XTension does this is tragic.
My first attempt at a fix was not successful. You can subscribe to events to tell you when the screen is put to sleep or woken up. In the event where the screen is going to sleep I hid all my open windows and in the event waking up the screen I showed them again. This was not enough to stop the thread contention issue. Possibly even drawing the menu is enough to cause the problem. I am not able to disable all the drawing in the app as far as I know. Though there are calls for windows to defer updates. There may be a Cocoa way to disable all screen drawing and I’ll have a look at that later. The pressure is off right now because I was able to get it working with a background helper app to check for the the main thread hanging in the app.
Ben had suggested a thread that pinged or otherwise checked on the regular spinning of the apps main thread. I tried this, but since I’m working in Xojo I’m limited to cooperative threads. If you block the main thread in a Xojo app you also block any other threads. Which is important to know if you’re working with threads and using semaphores to manage access to resources between the threads and the main thread. So I wasn’t very confident that the pinging thread would be effective since I expected that thread to get hung as well. That was indeed the case, the second thread stopped as well and so was never able to wake the screen.
The solution, hopefully temporary until Apple fixes this, was to create a separate terminal app to do the waking of the screen. Since command line apps have no GUI they aren’t affected by the problem. The background app just listens for a single character to arrive via STDIN. If it doesn’t get one from the main app at least every 5 seconds it makes a call to the Power Manager to assert a User Activity. Using the MBS plugins for Xojo this is easy, but I suspect it could fairly easily be done with a declare or external method call to the right library. To wake the screen I just did this:
Dim userActivityID as integer
Dim err As Integer = IOPMAssertionMBS.DeclareUserActivity( "waking screen for thread contention", IOPMAssertionMBS.kIOPMUserActiveLocal, userActivityID)
You’re supposed to keep that userActivityID around and re-use it for any previous calls, so don’t just reset it to 0 each time you make this call. Though I’m not sure if thats really necessary.
The terminal app is copied into XTension’s resources folder during compilation and I’ve created an interactive shell class in XTension that is very simple. It just launches the app and starts a timer that sends a “P” to the shells stdin every second. Since timers fire on the main thread they are all silenced by the thread contention issue and so it stops sending that ping. 5 seconds later the screen wakes up and all starts working again. If I set the timing to much less than 5 seconds then I seem to get a lot of wakeups for slightly longer program operations like regular database saves and such. The 5 seconds seems a good compromise between having it hang all the time and just keeping the screen awake all the time.
Which is the other solution. You could just call that user activity constantly or tell your users to not let the screen go to sleep at all. Both things also “solve” the problem. Interestingly enough making the request to stop app nap and adding the flag for stopping idle sleeping of the screen did not solve the problem. So App Nap is not keeping the screen awake in those cases, or perhaps the screen saver is starting or something I don’t know, but just doing that did not solve the problem.
Showing posts with label Software. Show all posts
Showing posts with label Software. Show all posts
Friday, January 5, 2018

Friday, September 22, 2017
cMediaFile a Xojo class for serving video or audio files to Safari on MacOS and iOS
My day job is as a developer for XTension a Mac based home automation system.
Some years ago something changed in Safari and it stopped playing the video clips that XTension saves off in response to motion or other perimeter violations. I could never get it to work on iOS either. This was remarkably frustrating to have to tell people that to view the video archives in the Web Interface they had to use a different browser. It continued to work just fine in Chrome and Firefox. I thought at first that it had to do with using a self signed certificate but it turns out that Safari absolutely requires you to support the Range header and to properly reply. The other browsers were happy with my response of the entirety of the file even though they also initially ask for a smaller range of bytes. Safari was not happy with that and flatly refused to load the files at all unless I supported their range request.
The Web Remote and Mobile Web Remote in XTension are developed with Xojo and the built in webFile class does not support range requests. Since figuring this out I’ve been able to implement a replacement class that does support them. Should any other Xojo developers need to serve up video or audio files to Safari or Mobile Safari they are free (as in beer) to use the cMediaFile class and even to improve it and make new submissions at the github repository.
Download the class and example project: https://github.com/PlanetaryGear/mediaFile
Here’s an example of XTension’s Video Archive page now working again in Safari!

Some years ago something changed in Safari and it stopped playing the video clips that XTension saves off in response to motion or other perimeter violations. I could never get it to work on iOS either. This was remarkably frustrating to have to tell people that to view the video archives in the Web Interface they had to use a different browser. It continued to work just fine in Chrome and Firefox. I thought at first that it had to do with using a self signed certificate but it turns out that Safari absolutely requires you to support the Range header and to properly reply. The other browsers were happy with my response of the entirety of the file even though they also initially ask for a smaller range of bytes. Safari was not happy with that and flatly refused to load the files at all unless I supported their range request.
The Web Remote and Mobile Web Remote in XTension are developed with Xojo and the built in webFile class does not support range requests. Since figuring this out I’ve been able to implement a replacement class that does support them. Should any other Xojo developers need to serve up video or audio files to Safari or Mobile Safari they are free (as in beer) to use the cMediaFile class and even to improve it and make new submissions at the github repository.
Download the class and example project: https://github.com/PlanetaryGear/mediaFile
Here’s an example of XTension’s Video Archive page now working again in Safari!

Friday, July 22, 2016
OSX’s “powerd” daemon has some bugs...
There are many threads on the internet about problems with the “powerd” daemon in OSX using up huge amounts of CPU time until everything else grinds to a halt. For me this problem started in Yosemite and has continued even through El Capitan 10.11.5. There is a .6 update for that now that I will install on my server shortly and see if that makes any difference.
On one site someone offered a bash shell script to regularly monitor the CPU usage of powerd and to kill it if it goes above 30%. I’ve wrapped that into an executable file that actually starts up in bash and doesn’t throw errors trying to run in tcsh which is the default shell on my system. I also added some code to send the CPU usage to XTension as well as keep track of the restart count. This way I can graph the CPU usage which looks like this over the last 2 days:
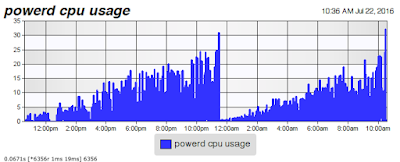
It takes just short of 11 hours for the spikes in activity to exceed the 30% threshold that causes the script to kill it and the system restarts it. I have no idea what the problem is, but something is definitely going on there. This graph is 24 hours of samples taken every 10 seconds so what you can’t see is that still most of the time in between those peaks it’s at 0% usage. Then it goes to do something periodically and each time it does it it takes a little bit more time. Some table not getting cleared? I don’t know what the cause is but it’s definitely real looking at that. Eventually if not killed the CPU usage becomes constant as it doesn’t finish servicing it’s queue before it has to service it again and the CPU usage becomes constant and debilitating to the machine.
If you’re also suffering from problems while having to continually kill powerd you can use this script. Cut and paste the code into any text editor, I like TextWranlger rather than using text edit built into the system, but any of them will work. Save it with the filename “powerd_monitor.command” the name is important! It must end in “.command” (and not .command.txt which text edit might try to add to the end of it) and it must be named powerd_monitor. This is because the script searches through the list of all processes for those containing the term “powerd” and it has to know how to exclude itself from the list that is returned. If you name it something else that also includes the term “powerd” then it will find multiple matches when searching and everything will error out and fail to do anything for you. So name the file “powerd_monitor.command”
You have to add the execute bit to the file. without that it won’t run when you double click it. If you’re terminal aware then thats easy. For anyone who isn’t you can do so by opening a terminal window and typing “chmod a+x “ (note the space after the x!) and then dragging the text file you’ve just created into the terminal window and pressing return.
If you aren’t an XTension user then you’ll want to remove the 2 lines that echo an applescript into osascript. Otherwise you’ll get an error printed for that with each check. Remove the 2 lines that begin “echo “tell app \”XTension\””
#!/bin/bash
# fill in your sudo password below or it won't be able to kill the process
# in XTension create a dimmable pseudo unit named "powerd cpu usage"
# in XTension create another dimmable pseudo unit named "powerd restart count"
# checks the cpu usage of powerd and if it's more than 30% it will kill it for you
# the output of the echo value is *100 so will say 40 for 0.4%!
sudopass='your sudo password here'
while true ; do
cpu_usage=`ps aux | grep powerd | grep -v grep | grep -v powerd_monitor| awk 'BEGIN {ORS=""} {print $3*100}'`
echo "powerd is using $cpu_usage"
echo "tell app \"XTension\" to set value of \"powerd cpu usage\" to ($cpu_usage / 100)" | osascript -
if [ $cpu_usage -ge 3000 ] ; then
echo 'killing powerd!!!'
echo $sudopass | sudo -S /usr/bin/killall powerd
echo "tell app \"XTension\" to set value of \"powerd restart count\" to value of \"powerd restart count\" + 1" | osascript -
fi
sleep 60
done
There is some talk in some of those forum posts that just not running Activity Monitor or not running some other app that is listening to events from the powerd daemon solves the problem. I am testing that now on my server but it hasn’t been off long enough to tell yet. In the first hour since I quit it it seems like it might be making a difference but it’s too early to tell. I will update this afternoon when I have some more info. I have personally spoken to people who never ran activity monitor on their machines during the issue though, so that is not the only cause even if it does help mine. Perhaps something subscribed to the events from it is enough to make it start to leak CPU. Perhaps it’s calculating the energy impact which is faulty that some of those apps cause it to have to do constantly. I will play with some of those other issues after I’m done with a cycle without the activity monitor running.
UPDATE: it sure looks like just not running activity monitor is keeping it from climbing away in my case.

This is definitely not the only problem that causes this as my day job work neighbor Michael has the problem and has never left activity monitor running on his machine. I expect that just quitting the program won’t solve the problem, but it might keep it from continuing to escalate until you restart or kill the powerd. I will continue to watch and post any further observations as it’s a very frustrating problem!
On one site someone offered a bash shell script to regularly monitor the CPU usage of powerd and to kill it if it goes above 30%. I’ve wrapped that into an executable file that actually starts up in bash and doesn’t throw errors trying to run in tcsh which is the default shell on my system. I also added some code to send the CPU usage to XTension as well as keep track of the restart count. This way I can graph the CPU usage which looks like this over the last 2 days:

It takes just short of 11 hours for the spikes in activity to exceed the 30% threshold that causes the script to kill it and the system restarts it. I have no idea what the problem is, but something is definitely going on there. This graph is 24 hours of samples taken every 10 seconds so what you can’t see is that still most of the time in between those peaks it’s at 0% usage. Then it goes to do something periodically and each time it does it it takes a little bit more time. Some table not getting cleared? I don’t know what the cause is but it’s definitely real looking at that. Eventually if not killed the CPU usage becomes constant as it doesn’t finish servicing it’s queue before it has to service it again and the CPU usage becomes constant and debilitating to the machine.
If you’re also suffering from problems while having to continually kill powerd you can use this script. Cut and paste the code into any text editor, I like TextWranlger rather than using text edit built into the system, but any of them will work. Save it with the filename “powerd_monitor.command” the name is important! It must end in “.command” (and not .command.txt which text edit might try to add to the end of it) and it must be named powerd_monitor. This is because the script searches through the list of all processes for those containing the term “powerd” and it has to know how to exclude itself from the list that is returned. If you name it something else that also includes the term “powerd” then it will find multiple matches when searching and everything will error out and fail to do anything for you. So name the file “powerd_monitor.command”
You have to add the execute bit to the file. without that it won’t run when you double click it. If you’re terminal aware then thats easy. For anyone who isn’t you can do so by opening a terminal window and typing “chmod a+x “ (note the space after the x!) and then dragging the text file you’ve just created into the terminal window and pressing return.
If you aren’t an XTension user then you’ll want to remove the 2 lines that echo an applescript into osascript. Otherwise you’ll get an error printed for that with each check. Remove the 2 lines that begin “echo “tell app \”XTension\””
Lastly you must fill in your admin password into the first line of code where is says “sudopass=“ since the powerd is owned by the system and not the user you can’t kill it without executing the kill command with sudo to get the proper permissions to do so. Otherwise it will fail to actually stop the process.
The output in the terminal is multiplied by 100. So 0.1% comes out as a 10 and so forth. I don’t know why the original script author had to do that, but I suspect it’s because bash is bad at math and wasn’t able to compare against floating point numbers properly.
The interval is currently set to check once a minute, but you can extend that or reduce it as necessary by changing the sleep value at the end. Of course, running the script too often will cause it to use far more CPU time than is necessary and make your problem worse not better. I generated the graph above with a check happening every 10 seconds.
#!/bin/bash
# fill in your sudo password below or it won't be able to kill the process
# in XTension create a dimmable pseudo unit named "powerd cpu usage"
# in XTension create another dimmable pseudo unit named "powerd restart count"
# checks the cpu usage of powerd and if it's more than 30% it will kill it for you
# the output of the echo value is *100 so will say 40 for 0.4%!
sudopass='your sudo password here'
while true ; do
cpu_usage=`ps aux | grep powerd | grep -v grep | grep -v powerd_monitor| awk 'BEGIN {ORS=""} {print $3*100}'`
echo "powerd is using $cpu_usage"
echo "tell app \"XTension\" to set value of \"powerd cpu usage\" to ($cpu_usage / 100)" | osascript -
if [ $cpu_usage -ge 3000 ] ; then
echo 'killing powerd!!!'
echo $sudopass | sudo -S /usr/bin/killall powerd
echo "tell app \"XTension\" to set value of \"powerd restart count\" to value of \"powerd restart count\" + 1" | osascript -
fi
sleep 60
done
UPDATE: it sure looks like just not running activity monitor is keeping it from climbing away in my case.

Since about 10:30am it’s CPU usage hasn’t climbed above about 0.5% of the CPU that it’s running on. It shows no signs of continuing to leak CPU time.
This is definitely not the only problem that causes this as my day job work neighbor Michael has the problem and has never left activity monitor running on his machine. I expect that just quitting the program won’t solve the problem, but it might keep it from continuing to escalate until you restart or kill the powerd. I will continue to watch and post any further observations as it’s a very frustrating problem!
Tuesday, September 16, 2014
Serial2tcp sharing a serial port on your computer to a remote device
There are dozens of ways to connect to remote devices from XTension but it occurred to me that there isn’t a simple way to just share one connected to another Mac. This little app will connect a local serial port on any Mac to a TCP port. Listen for a connection to the port and then forward data between the two. It can connect multiple serial ports and TCP ports with only one process. I’ve made no attempt to code for the opposite side of the equation, turning a TCP stream back into a virtual com port because thats not necessary for XTension. Anything XTension can connect to via a local port it can also connect to via a TCP stream.
download: serial2tcp.zip
(since the code was fairly straightforward I was able to load the source into an older version of the compiler and create a fat binary with both Intel and PPC code for anyone wanting to recycle a really old machine. I’m not entirely sure how far back in OS versions this will run, but it would be worth trying on 10.4 intel or ppc machines.)
download ppc: serial2tcp_ppc.zip
download and unzip. I would recommend placing the serial2tcp folder inside the Applications folder. There is a folder of libraries inside it as well that must remain next to the application regardless where you put it. Then if you’re the kind of person who likes to run things from the command line you can make an alias to your /bin directory.
command line options:
--help prints out the help
--list prints out a list of available serial ports on your computer
--share [serial port name] [serial port baud] [tcp port number]
--share is the main entry point for getting it to do anything. Get the serial port name from the --list function, a standard baud rate and a TCP port above 1024 to run it on.
For example to share a CM11a on a remote machine you’d use something like:
/Applications/serial2tcp/serial2tcp --share usberial_FT5434 4800 2000
would connect to an FTDI based usb/serial adaptor with that name, open the port at 4800 baud and share it on port 2000. If you wish to share more than one port you can use multiple --share parameters. But they must have unique serial port names and TCP port numbers.
The program will allow only 1 connection at a time for any given serial port but will re-listen if a connection goes away. So you should be able to reconnect to it without restarting it or any such thing. It also makes a valiant effort to reconnect to a lost serial port. If someone pulls the USB plug and plugs it back in on the remote machine it will work very hard to reconnect to that port and then reconnect it to the already open TCP stream. If you’re lucky you wont even miss any data. On 10.9 with the latest FTDI drivers I had no trouble with this apart from the garbage data being sent down the serial port making my CM11 freak out until being power cycled. On earlier OS versions though it was not uncommon to get a kernel panic if an open usb/serial adaptor was pulled while in use. So YMMV.
To use it then in XTension just select “remote tcp port” instead of a serial port from the available port popup. Enter the IP address of the computer doing the sharing and the port number you’ve chosen, in the above example 2000. The computer hosting the port should be configured with a static IP address or a reserved DHCP address so that it doesn’t change. If you want to share across the internet you’ll have to be able to create the proper NAT pass throughs to reach it. It’s a server listening for an incoming connection on the port not a client that can make an outgoing connection.
Thats all well and good, but the real value would be in having it launch at computer startup and run no matter who is logged in or if anybody is logged in to the computer. This is possible by setting up a system launchd configuration file for it. The following instructions are for OSX 10.9 and later, but it should work for the last few versions. Earlier than 10.7 and you should verify the proper launchd plist configuration because I believe it has changed since 10.6.
Inside the serial2tcp folder you’ll find a file called “com.sentman.serial2tcp.plist” this is a boilerplate launchd configuration file that you will need to edit for your own use. If you have apple’s dev tools installed then you can use the excellent plist editor, otherwise any text editor can do it but pay attention to the XML structure. Screenshots below are from the plist editor.

The “label” must be unique and should be the same name as the file but without the .plist at the end. You can leave it like it is unless you’re starting multiple instances.
the first program argument must be the link to the program you wish to run, in this case I put it in the Applications folder, but if you put it somewhere else then change that link.
The following parameters are the same as if you were adding them at the command line. In this example I’m sharing usbserial-FTG3LGPX at 57600 baud on port 2000. You’ll want to change those for your own settings. You can add more program arguments if you wish to share more than one port. Just repeat items 1 through 4 with the new info in them.
Once you’ve saved this back you’ll need to place a copy into the system launchd folder which is at /Library/LaunchAgents you can use the command line to get there or the “go to folder” option of the finders “Go” menu and enter that path. It will ask you to enter your password in the finder because this is a system protected folder and you need to run as an administrator to move files in and out of it. Once the file is there you’ll need to edit the owner of the file. It must be owned as root in order to be loaded while nobody is logged in. I could not get this to work from the finder’s file permissions panel and so it must be done from the command line.
Open a terminal window and type:
cd /Library/LaunchAgents
then
sudo chown root ./com.sentman.serial2tcp.plist
again it will ask you for your password to make sure you’re actually allowed to make a file owned as root.
You can test without rebooting by using the launchctl command from the same command line, type:
sudo launchctl load ./com.sentman.serial2tcp.plist
and you should just get the cursor again if no errors occurred. The program will log it’s output to the system log while running in the background so look there for connect/disconnect errors or other messages. If all went well you should now be able to see it running with the activity manager and connect to the port from XTension and share the device.
This article is cross posted at MacHomeAutomation.com
download: serial2tcp.zip
(since the code was fairly straightforward I was able to load the source into an older version of the compiler and create a fat binary with both Intel and PPC code for anyone wanting to recycle a really old machine. I’m not entirely sure how far back in OS versions this will run, but it would be worth trying on 10.4 intel or ppc machines.)
download ppc: serial2tcp_ppc.zip
download and unzip. I would recommend placing the serial2tcp folder inside the Applications folder. There is a folder of libraries inside it as well that must remain next to the application regardless where you put it. Then if you’re the kind of person who likes to run things from the command line you can make an alias to your /bin directory.
command line options:
--help prints out the help
--list prints out a list of available serial ports on your computer
--share [serial port name] [serial port baud] [tcp port number]
--share is the main entry point for getting it to do anything. Get the serial port name from the --list function, a standard baud rate and a TCP port above 1024 to run it on.
For example to share a CM11a on a remote machine you’d use something like:
/Applications/serial2tcp/serial2tcp --share usberial_FT5434 4800 2000
would connect to an FTDI based usb/serial adaptor with that name, open the port at 4800 baud and share it on port 2000. If you wish to share more than one port you can use multiple --share parameters. But they must have unique serial port names and TCP port numbers.
The program will allow only 1 connection at a time for any given serial port but will re-listen if a connection goes away. So you should be able to reconnect to it without restarting it or any such thing. It also makes a valiant effort to reconnect to a lost serial port. If someone pulls the USB plug and plugs it back in on the remote machine it will work very hard to reconnect to that port and then reconnect it to the already open TCP stream. If you’re lucky you wont even miss any data. On 10.9 with the latest FTDI drivers I had no trouble with this apart from the garbage data being sent down the serial port making my CM11 freak out until being power cycled. On earlier OS versions though it was not uncommon to get a kernel panic if an open usb/serial adaptor was pulled while in use. So YMMV.
To use it then in XTension just select “remote tcp port” instead of a serial port from the available port popup. Enter the IP address of the computer doing the sharing and the port number you’ve chosen, in the above example 2000. The computer hosting the port should be configured with a static IP address or a reserved DHCP address so that it doesn’t change. If you want to share across the internet you’ll have to be able to create the proper NAT pass throughs to reach it. It’s a server listening for an incoming connection on the port not a client that can make an outgoing connection.
Thats all well and good, but the real value would be in having it launch at computer startup and run no matter who is logged in or if anybody is logged in to the computer. This is possible by setting up a system launchd configuration file for it. The following instructions are for OSX 10.9 and later, but it should work for the last few versions. Earlier than 10.7 and you should verify the proper launchd plist configuration because I believe it has changed since 10.6.
Inside the serial2tcp folder you’ll find a file called “com.sentman.serial2tcp.plist” this is a boilerplate launchd configuration file that you will need to edit for your own use. If you have apple’s dev tools installed then you can use the excellent plist editor, otherwise any text editor can do it but pay attention to the XML structure. Screenshots below are from the plist editor.
The “label” must be unique and should be the same name as the file but without the .plist at the end. You can leave it like it is unless you’re starting multiple instances.
the first program argument must be the link to the program you wish to run, in this case I put it in the Applications folder, but if you put it somewhere else then change that link.
The following parameters are the same as if you were adding them at the command line. In this example I’m sharing usbserial-FTG3LGPX at 57600 baud on port 2000. You’ll want to change those for your own settings. You can add more program arguments if you wish to share more than one port. Just repeat items 1 through 4 with the new info in them.
Once you’ve saved this back you’ll need to place a copy into the system launchd folder which is at /Library/LaunchAgents you can use the command line to get there or the “go to folder” option of the finders “Go” menu and enter that path. It will ask you to enter your password in the finder because this is a system protected folder and you need to run as an administrator to move files in and out of it. Once the file is there you’ll need to edit the owner of the file. It must be owned as root in order to be loaded while nobody is logged in. I could not get this to work from the finder’s file permissions panel and so it must be done from the command line.
Open a terminal window and type:
cd /Library/LaunchAgents
then
sudo chown root ./com.sentman.serial2tcp.plist
again it will ask you for your password to make sure you’re actually allowed to make a file owned as root.
You can test without rebooting by using the launchctl command from the same command line, type:
sudo launchctl load ./com.sentman.serial2tcp.plist
and you should just get the cursor again if no errors occurred. The program will log it’s output to the system log while running in the background so look there for connect/disconnect errors or other messages. If all went well you should now be able to see it running with the activity manager and connect to the port from XTension and share the device.
This article is cross posted at MacHomeAutomation.com
Friday, July 26, 2013
SSL/HTTPS passthrough server for XTension
The various ways of making a web interface in XTension have suffered from a lack of an easy way to get an SSL/HTTPS connection going. The older interface using apache and X2Web could be encrypted by installing a certificate into Apache but that was "non-trivial" as they say in the business.
UPDATE: The new interface now has HTTPS and certificate generation built in! Setting up this software is no longer necessary for a secure connection to the XTension Web Interface, but it may still be useful for encrypting the connections to other services.
So in the meantime I have created a simple SSL passthrough server. It will allow a browser (or any SSL socket really) to connect to it, handle the decryption and forward the connection on to either apach on your local or other server, or to the new Web Remote. With the password set on the new web remote this should offer a good measure of security for your system.
To make this work you would run the program on the same server as XTension and set the port of the SSL Passthrough server to a high port. Say 8080. Then setup your NAT Router or airport to forward traffic to the SSL Passthrough servers port and NOT the native port that your web server or web remote session is running on. The passthrough server will forward the hits on to the unencrypted server on your local machine or across your local network and sniffing your password on an unencrypted wifi or other network will be as difficult as any other HTTPS encrypted connection.
The server can be used with any web server or remote product that you're using on the local network.
The first thing you must do is to create your own ssl certificate. You can do this with the built in tools on MacOS. Follow the first 4 steps on this web page. Once you have the resultant files you need to use any text editor to past 2 of them together for the sslpass program to use. First open the "server.key" file. it should begin with a line like: "-----BEGIN RSA PRIVATE KEY-----" then open the "server.crt" file which should being like: " -----BEGIN CERTIFICATE-----" cut and past both blocks of data one after another (a couple of lines of clear space between them in the text file is fine) into a new file. Save that file into the same folder as the sslpass program and call it "certificate.txt"
the folder with the application and the certificate should look like this:

UPDATE: The new interface now has HTTPS and certificate generation built in! Setting up this software is no longer necessary for a secure connection to the XTension Web Interface, but it may still be useful for encrypting the connections to other services.
So in the meantime I have created a simple SSL passthrough server. It will allow a browser (or any SSL socket really) to connect to it, handle the decryption and forward the connection on to either apach on your local or other server, or to the new Web Remote. With the password set on the new web remote this should offer a good measure of security for your system.
To make this work you would run the program on the same server as XTension and set the port of the SSL Passthrough server to a high port. Say 8080. Then setup your NAT Router or airport to forward traffic to the SSL Passthrough servers port and NOT the native port that your web server or web remote session is running on. The passthrough server will forward the hits on to the unencrypted server on your local machine or across your local network and sniffing your password on an unencrypted wifi or other network will be as difficult as any other HTTPS encrypted connection.
The server can be used with any web server or remote product that you're using on the local network.
The first thing you must do is to create your own ssl certificate. You can do this with the built in tools on MacOS. Follow the first 4 steps on this web page. Once you have the resultant files you need to use any text editor to past 2 of them together for the sslpass program to use. First open the "server.key" file. it should begin with a line like: "-----BEGIN RSA PRIVATE KEY-----" then open the "server.crt" file which should being like: " -----BEGIN CERTIFICATE-----" cut and past both blocks of data one after another (a couple of lines of clear space between them in the text file is fine) into a new file. Save that file into the same folder as the sslpass program and call it "certificate.txt"
the folder with the application and the certificate should look like this:
the program is a command line application that you pass the parameters to from the command line. A typical setting might be something like:
/path/to/program/folder/sslpass -listenport 8080
that would be the simplest setting, it will listen on port 8080 for HTTPS connections and forward them to the localhost on port 80. The last 2 parms are the default. If you are using this with X2Web then thats really all that is necessary. If you wish to forward it to a different port say for a WebRemote install you would do something like:
/path/to/program/folder/sslpass -listenport 8080 -remoteport 10023
assuming that your web remote instance was running on port 10023 on the localhost. You can run as many instances of this passthrough server as you wish for encrypting multiple web servers on multiple ports. Or even pass through to unencrypted sources on entirely different machines by adding the optional -remoteaddress 192.168.x.x parameter.
if you wish these passthroughs to be started automatically you can include them in a terminal file and make them part of your startup items. Paste the command line as you would type it into another text file and save it with a file extension of ".command" so it might be something like "startsslforweb.command" when double clicked that will run it as if you had typed it into the command line and you can add those to the startup items in the user control panel for launching upon startup.
Remember though that you can't set it to listen on a port less than 1024 without some dangerous permissions magic. Dont do it.
The program requires an Intel Mac, and it should run as far back as OSX 10.5 though I have not tested that. The program is freeware for owners of XTension, please consider purchasing a license for one of the XTension add on programs that I sell like the web remote or XTdb.
download: sslpass.zip version 1.0 July 26th 2013
PS: this program uses only the open SSL libraries as available all over the world and used in every web browser currently shipping in every country. If there are other import restrictions to your country from mine please do not download this program.
Monday, November 5, 2012
batch moving iCal events from one calendar to another with AppleScript
What with all the iOS devices and the cloud and all I thought I would finally sort out the mess which is our iCal calendars around here and put them all on the cloud so that everyone could have read/write access and everything would be shiny and new and wonderful. That took a little more work than it should have, iCal is currently my least favorite of all Apple's software. Searching on the internet though I see I'm not the only one who has had these problems so I document my solution for anyone who might benefit from it.
I had the calendars hosed on just a webDav directory on my own server but this did not allow read/write access for all family members subscribed. I wanted to move them to my iCloud account and then resubscribe everyone (well, technically my wife is the only other member of everyone ;) my first thought was to just export them through iCal to my disk as .ics files and then re-import them into new calendars created on iCloud.
This did not work. I got the following modal error message which had to be dismissed for EVERY SINGLE event in the file before I could get back to normal.

Access to "some event" in "the new calendar name" in account "name of my account" is not permitted. The server responded: "403" to operation CalDAVWriteEntityQueuableOperation.
This is not particularly helpful and the buttons are not really very apple like or helpful either. After signing out and back in again and recreating my iCloud account I was able to get ONE calendar to import without errors, and then they returned. Thats an old event, so I thought perhaps it was just complaining that events too far in the past weren't allowed to be imported. So I created manually a small ICS file to test with that only had future events in it, but that failed too.
I resorted to applescript. The dictionary has both a duplicate and a move command one or the other should be able to copy or move the events in the calendars I wanted to change. I can change the events from one to the other one at a time by just changing the "calendar" in the popup for the event. That worked fine, so it was allowing me to add things to the calendar, it just didn't like importing it. Or, as it turned out the duplicate or move command. Both of those tries resulted in the same error and total failure. Finally I resorted to the make new event command which requires a bit more work because I had to create the record of all the old properties one bit at a time. And since it will happily return "no value" or "undefined" for properties that aren't set for that event, but it will not accept those as properties for a new event you have to check to make sure each property exists before adding it to the new record. I did not attempt to preserver attendees or other event properties not in the list below so I dont know how to do that. But with this script you can move all the events from one calendar to another without errors from iCal even where an import fails. I suspect it may have something to do with including the unique ID in the export file. Possibly you cannot specify the UID of a new event, or possibly it really means unique, and not just unique within each individual calendar and that is what is causing the error. I left the UID out of the script below but I did not test with trying to include it.
It is not fast, it takes some time for each event to be created, so be patient.
Or you can download the script as a script editor file: icalmover.zip
Let me know if thats of any help to anyone, thanks.
I had the calendars hosed on just a webDav directory on my own server but this did not allow read/write access for all family members subscribed. I wanted to move them to my iCloud account and then resubscribe everyone (well, technically my wife is the only other member of everyone ;) my first thought was to just export them through iCal to my disk as .ics files and then re-import them into new calendars created on iCloud.
This did not work. I got the following modal error message which had to be dismissed for EVERY SINGLE event in the file before I could get back to normal.
Access to "some event" in "the new calendar name" in account "name of my account" is not permitted. The server responded: "403" to operation CalDAVWriteEntityQueuableOperation.
This is not particularly helpful and the buttons are not really very apple like or helpful either. After signing out and back in again and recreating my iCloud account I was able to get ONE calendar to import without errors, and then they returned. Thats an old event, so I thought perhaps it was just complaining that events too far in the past weren't allowed to be imported. So I created manually a small ICS file to test with that only had future events in it, but that failed too.
I resorted to applescript. The dictionary has both a duplicate and a move command one or the other should be able to copy or move the events in the calendars I wanted to change. I can change the events from one to the other one at a time by just changing the "calendar" in the popup for the event. That worked fine, so it was allowing me to add things to the calendar, it just didn't like importing it. Or, as it turned out the duplicate or move command. Both of those tries resulted in the same error and total failure. Finally I resorted to the make new event command which requires a bit more work because I had to create the record of all the old properties one bit at a time. And since it will happily return "no value" or "undefined" for properties that aren't set for that event, but it will not accept those as properties for a new event you have to check to make sure each property exists before adding it to the new record. I did not attempt to preserver attendees or other event properties not in the list below so I dont know how to do that. But with this script you can move all the events from one calendar to another without errors from iCal even where an import fails. I suspect it may have something to do with including the unique ID in the export file. Possibly you cannot specify the UID of a new event, or possibly it really means unique, and not just unique within each individual calendar and that is what is causing the error. I left the UID out of the script below but I did not test with trying to include it.
It is not fast, it takes some time for each event to be created, so be patient.
tell application "Calendar"
--Script to move events from one iCal calendar to another
--James Sentman james@sentman.com 11/4/2012
--
-- I found myself unable to import ical calendars that I had exported from another
-- server. I would get an error from the iCal server for each and every event.
-- I have no idea why, it may be just duplicate UID's or something.
-- The "duplicate" command and the "move" command both of which I tried
-- failed with the same error, but I was able to create a new one with the
-- info gotten from the old calendar. But that wasn't so easy either as not
-- all events have all information and it would not except "no value" answers
-- so I had to add the if exists portion to build the record for the new event.
-- I did not attempt to move things like attendees or other elements of the event
-- just the data you see below.
--
-- INSTRUCTIONS: change the name of these next 2 variables. MyOldCal is
-- the calendar you want to move events FROM and MyNewCal is the name of the
-- calendar that they will be newly created in.
set MyOldCal to calendar "SCDS"
set MyNewCal to calendar "SCDS iCloud"
-- find out how many events we have to create
-- for some reason I would get an error when it reached "count"
-- which generally means that while the count tells you how many records
-- referencing them by index begins at 0 instead of 1, so start at 0
-- and subtract one.
set EventCount to (count of events in MyOldCal) - 1
repeat with i from 0 to EventCount
--get a reference to the old event in the old calendar
set WorkEvent to event i of MyOldCal
--since the work record with the info is appended instead
--of created fresh each time in one step it is necessary to clear
--it out each time through the loop.
set WorkRecord to {}
--checking if the various properties exist or not
--stops an error later if one property was undefined
--it will happily return no value for one of them without
--an error, but it will not then accept that in the make
--statement below. So we only add them to the record
--if they are actually there.
if exists description of WorkEvent then
set TheDescription to description of WorkEvent
set WorkRecord to WorkRecord & {description:TheDescription}
end if
if exists start date of WorkEvent then
set TheStartDate to start date of WorkEvent
set WorkRecord to WorkRecord & {start date:TheStartDate}
end if
if exists end date of WorkEvent then
set TheEndDate to end date of WorkEvent
set WorkRecord to WorkRecord & {end date:TheEndDate}
end if
if exists allday event of WorkEvent then
set TheAllDay to allday event of WorkEvent
set WorkRecord to WorkRecord & {allday event:TheAllDay}
end if
if exists recurrence of WorkEvent then
set TheRecurrence to recurrence of WorkEvent
set WorkRecord to WorkRecord & {recurrence:TheRecurrence}
end if
if exists sequence of WorkEvent then
set TheSequence to sequence of WorkEvent
set WorkRecord to WorkRecord & {sequence:TheSequence}
end if
if exists stamp date of WorkEvent then
set TheStampDate to stamp date of WorkEvent
set WorkRecord to WorkRecord & {stamp date:TheStampDate}
end if
if exists excluded dates of WorkEvent then
set TheExcludedDates to excluded dates of WorkEvent
set WorkRecord to WorkRecord & {excluded dates:TheExcludedDates}
end if
if exists status of WorkEvent then
set TheStatus to status of WorkEvent
set WorkRecord to WorkRecord & {status:TheStatus}
end if
if exists summary of WorkEvent then
set TheSummary to summary of WorkEvent
set WorkRecord to WorkRecord & {summary:TheSummary}
end if
if exists location of WorkEvent then
set TheLocation to location of WorkEvent
set WorkRecord to WorkRecord & {location:TheLocation}
end if
--you can try copying the UID also
--but it occurred to me that this may be the whole problem
--as a UID should be unique, and it would not be so
--if you had tried to create an event and specifying it at the time
--so I commented this out and iCal will happily make a new UID for the
--new event as it should.
--if exists uid of WorkEvent then
-- set TheUID to uid of WorkEvent
-- copy {uid:TheUID} to the end of WorkRecord
--end if
if exists url of WorkEvent then
set TheURL to url of WorkEvent
set WorkRecord to WorkRecord & {url:TheURL}
end if
--and lastly actually make the new event with the old data.
make new event at MyNewCal with properties WorkRecord
end repeat
return EventCount & " events moved"
end tell
Let me know if thats of any help to anyone, thanks.
Sunday, June 10, 2012
Wiznet Configurator for Mac v2
Update 12/21/2020: The home of the Wiznet Configurator for Mac has moved to the Mac Home Automation site. There is a new version hosted there which is fully notarized for Catalina and newer as well as having native code for Apple Silicon.
This version also adds the ability to save and restore configurations to disk.
previous entries with more information here and before that here. XTension is my day job and is Home Automation and Security software for the Macintosh.
new download links:
Wiznet Configurator MacOS Universal
Wiznet Configurator Linux
Friday, February 10, 2012
Wiznet Configuration Update
(Updated 6/10/12: see below)
While updating the MaxSonar driver in XTension to support connections to TCP/Serial adaptors I discovered an important error in the last version of the Wiznet Configurator for Macintosh. The documentation available on the web of the protocol for talking to these devices is actually incorrect in the settings for the client/mixed/server mode byte. If you’re thinking of working on one of these yourself you’ll want to know that the proper values are 0=client, 1=mixed and 2=server. The documentation shows server and mixed swapped which causes all the reconnection problems that some people have mentioned.
The download links to the updated versions are below.
 Wiznet makes an excellent ethernet to serial board that is inexpensive and is fully supported by XTension unfortunately they never had a Mac version of their configuration utility that lets you give it an address and setup the serial port.
I noticed yesterday that they had published the specs for talking to the boards making it possible for me to throw a configuration utility for the Mac together. I could theoretically compile it for Linux and Windows too if anybody is interested let me know, I just dont have a machine handy for testing those targets so I haven't done so yet.
The program seems to work and implements all of the available fields though some of them appear to be different in the version of the firmware that I've got than what is documented. Indeed in the documentation even the length of the data packets is wrong so i'm not sure the things i haven't tested actually work.
To use it plugin a 5v power supply and ethernet to your wiznet board. It will assign itself an address or take one from your DHCP server depending on. To find it run the software and all wiznet boards found will be displayed. Double click one in the list to edit it.

To use one with XTension it needs a static IP address and be in Server mode. Then setup the serial port for whatever settings are needed for the particular device. This should work with CM11's and W800's and Weeder chains and just about every other device in XTension that supports a remote TCP connection instead of a local serial port.
I was unable to make the direct connection to the device work, so the configuration is returned via a UDP broadcast. What this will mean for having multiple devices on your local network I dont know yet, I only have the one but i've just ordered some more, and some with multiple ports to experiment with further.
This is released as freeware and AS IS. Let me know if it gives you any trouble and please feel free to make a small donation via paypal to james@sentman.com if it turns out to be useful to you.
(update: 2/8/11 added the linux compile. I haven't even tried to run it but it might help someone out, please let me know if anybody finds it useful)
While updating the MaxSonar driver in XTension to support connections to TCP/Serial adaptors I discovered an important error in the last version of the Wiznet Configurator for Macintosh. The documentation available on the web of the protocol for talking to these devices is actually incorrect in the settings for the client/mixed/server mode byte. If you’re thinking of working on one of these yourself you’ll want to know that the proper values are 0=client, 1=mixed and 2=server. The documentation shows server and mixed swapped which causes all the reconnection problems that some people have mentioned.
The download links to the updated versions are below.
Wiznet makes an excellent ethernet to serial board that is inexpensive and is fully supported by XTension unfortunately they never had a Mac version of their configuration utility that lets you give it an address and setup the serial port.I noticed yesterday that they had published the specs for talking to the boards making it possible for me to throw a configuration utility for the Mac together. I could theoretically compile it for Linux and Windows too if anybody is interested let me know, I just dont have a machine handy for testing those targets so I haven't done so yet.
The program seems to work and implements all of the available fields though some of them appear to be different in the version of the firmware that I've got than what is documented. Indeed in the documentation even the length of the data packets is wrong so i'm not sure the things i haven't tested actually work.
To use it plugin a 5v power supply and ethernet to your wiznet board. It will assign itself an address or take one from your DHCP server depending on. To find it run the software and all wiznet boards found will be displayed. Double click one in the list to edit it.

I was unable to make the direct connection to the device work, so the configuration is returned via a UDP broadcast. What this will mean for having multiple devices on your local network I dont know yet, I only have the one but i've just ordered some more, and some with multiple ports to experiment with further.
This is released as freeware and AS IS. Let me know if it gives you any trouble and please feel free to make a small donation via paypal to james@sentman.com if it turns out to be useful to you.
(update: 2/8/11 added the linux compile. I haven't even tried to run it but it might help someone out, please let me know if anybody finds it useful)
(update: 2/10/12 now at version 1 because of fixes to server/client/mixed setting and the proper setting of the serial debug mode flag which is 1 for off and 0 for on, go figure)
(update: 6/10/12 new version fixes UDP/TCP setting bug please visit: here for new version)
wiznet devices can be purchased from Sparkfun as well as Saelig Electronics
(update: 6/10/12 new version fixes UDP/TCP setting bug please visit: here for new version)
wiznet devices can be purchased from Sparkfun as well as Saelig Electronics
Subscribe to:
Posts (Atom)